🔗 WCCP 2 with TPROXY on Ubuntu 12.04
by Eliezer Croitoru
🔗 WCCP是什么?
WCCP 是 “Web Cache Communication Protocol” 的缩写
WCCP 的优点是什么?WCCP 允许网络和应用程序之间职责分离,从而实现自动冗余。
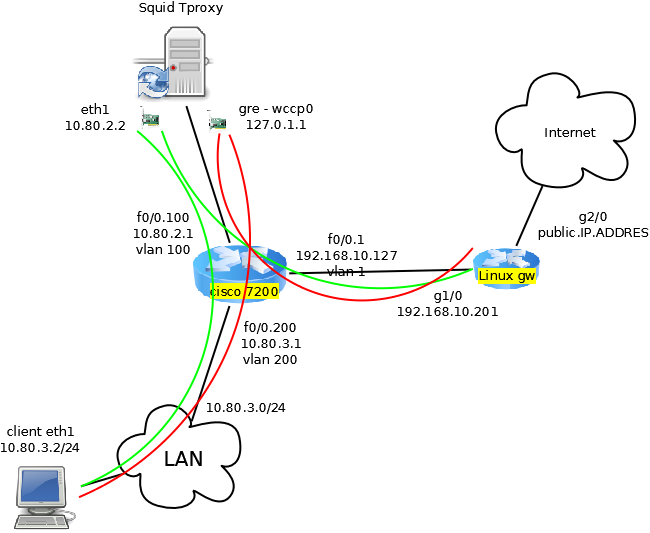
路由器在路由层面动态拦截数据包有几个连接点。“IN”和“OUT”分别代表入站和出站数据包。思科路由器上的 WCCP 守护进程会获取有关缓存供应商和服务的信息。然后,在思科路由器上,我们可以定义 ACL 来应用该服务,除了缓存提供的缓存设置之外。
缓存供应商可以通过两种方式与思科设备交互:GRE 隧道和二层交换转发。当与 GRE 隧道一起使用时,所有进入和离开客户端的流量都将在 GRE 隧道中传输到代理。
思科路由器会将封装在 GRE 隧道中的“劫持”数据包转发给代理。(代理应该知道如何处理这些数据包。)
- 代理会根据需要处理会话。
在常规的拦截/NAT 代理中,请求将使用客户端在常规接口上的 IP 地址从源服务器请求。因此,需要在思科上应用的 ACL 是:“仅捕获这些特定的 IP 和端口”,但在 tproxy 模式下,由于客户端的 IP 地址被欺骗,如果我们应用相同的 ACL,我们将陷入无休止的循环。因此,我们不应用常规的 WCCP ACL,而是应用 WCCP 中的另一个内置 ACL,这就是 EXCLUDE。
EXCLUDE 仅应用于接口(或 VLAN 接口),因此我们需要区分客户端和代理的流量。在我们的例子中,我们使用了另一个接口。在路由器上,我们使用 f1/0 接口用于客户端,f1/0 接口用于代理,f0/0 接口连接到互联网。
我们在 f0/0 接口上应用拦截 ACL,因此任何端口 80 的目标都将被拦截。
🔗 目录
在 Ubuntu 12.04 上使用 WCCP v2 配置 Squid 的 TPROXY 模式的步骤。这些步骤用于设置 Squid-3.1 和 TPROXYv4、IP 欺骗和思科 WCCP。
这些步骤是手动应用于 Ubuntu 12.04 LTS 的,而不是使用 Ubuntu 的自动网络设置“/etc/network/interfaces”文件。由于我发现直到现在还没有以用户友好的方式对此进行解释,因此我决定将其写下来。
它基于 这位我不知道名字的俄罗斯教程
🔗 基本假设
您知道 Squid 的 TPROXY 和拦截模式之间的区别。
您了解基本的网络知识和思科 CLI 基础知识。
您知道什么是 GRE 隧道。
🔗 拓扑
🔗 Linux 和 Squid 配置
Ubuntu 的要求:基本的 Ubuntu 服务器预装了 iptunnel、iprourte2 和完成此任务所需的所有 iptables 模块。
#!/usr/bin/bash

echo "Loading modules.."
modprobe -a nf_tproxy_core xt_TPROXY xt_socket xt_mark ip_gre gre


LOCALIP="10.80.2.2"
CISCODIRIP="10.80.2.1"
CISCOIPID="192.168.10.127"

echo "changing routing and reverse path stuff.."
echo 0 > /proc/sys/net/ipv4/conf/lo/rp_filter
echo 1 > /proc/sys/net/ipv4/ip_forward

echo "creating tunnel..."
iptunnel add wccp0 mode gre remote $CISCOIPID local $LOCALIP dev eth1
ifconfig wccp0 127.0.1.1/32 up

echo "creating routing table for tproxy..."
ip rule add fwmark 1 lookup 100
ip route add local 0.0.0.0/0 dev lo table 100

echo "creating iptables tproxy rules..."
iptables -A INPUT  -i lo -j ACCEPT
iptables -A INPUT  -p icmp -m icmp --icmp-type any -j ACCEPT
iptables -A FORWARD -i lo -j ACCEPT
iptables -A INPUT  -s $CISCODIRIP -p udp -m udp --dport 2048 -j ACCEPT
iptables -A INPUT -i wccp0 -j ACCEPT
iptables -A INPUT -p gre -j ACCEPT

iptables -t mangle -F
iptables -t mangle -A PREROUTING -d $LOCALIP -j ACCEPT
iptables -t mangle -N DIVERT
iptables -t mangle -A DIVERT -j MARK --set-mark 1
iptables -t mangle -A DIVERT -j ACCEPT
iptables -t mangle -A PREROUTING -p tcp -m socket -j DIVERT
iptables -t mangle -A PREROUTING -p tcp --dport 80 -j TPROXY --tproxy-mark 0x1/0x1 --on-port 3129
在 squid.conf 中添加以下行
#add change the src subnet to the list of clients subnets allowed.
acl clients src 10.80.0.0/16

http_access allow clients

http_port 127.0.0.1:3128
http_port 3129 tproxy

# replace 10.80.2.1 with your cisco router directly connected interface
wccp2_router 10.80.2.1
wccp_version 2
wccp2_rebuild_wait on
wccp2_forwarding_method 1
wccp2_return_method 1
wccp2_service standard 0
wccp2_service dynamic 80
wccp2_service dynamic 90
wccp2_service_info 80 protocol=tcp flags=src_ip_hash priority=240 ports=80
wccp2_service_info 90 protocol=tcp flags=dst_ip_hash,ports_source priority=240 ports=80
🔗 思科设置
conf t

ip access-list extended wccp
 permit ip 10.80.3.0 0.0.0.255 any
ip access-list extended wccp_to_inside
 permit ip any 10.80.3.0 0.0.0.255
exit
ip wccp version 2
ip wccp web-cache
ip wccp 80 redirect-list wccp
ip wccp 90 redirect-list wccp_to_inside

interface FastEthernet0/0
 ip wccp 80 redirect out
 ip wccp 90 redirect in

interface FastEthernet0/1
 ip wccp redirect exclude in
🔗 构建 Squid
在自定义构建的 Squid 中,您必须包含
--enable-linux-netfilter --enable-wccpv2
⚠️ Disclaimer: Any example presented here is provided "as-is" with no support
or guarantee of suitability. If you have any further questions about
these examples please email the squid-users mailing list.
类别: ConfigExample
导航:网站搜索、网站页面、分类、🔼 向上